Learn from Experts
The Expert Center has been a long time favorite but we felt it was getting dated. Since updating our website with the removal of the Expert Center, we have had requests to bring back the more relevant pages. This is that start of the long process of moving the data from the old website to our new website. The first two topics have been added on request. The photos will be added shortly. We know these pages of little value without the photos but this is a process. Section by section, page by page and photo by photo. Send us feedback.
Keel Strip
Gel Coat Repair
Fixing a Holed Kayak
Coldwater Safety
Buntline Hitch
Keel Strip
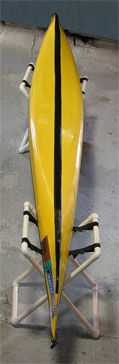
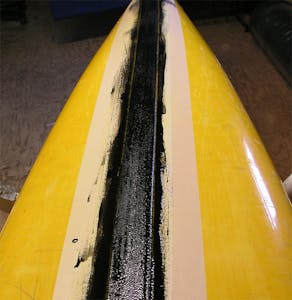
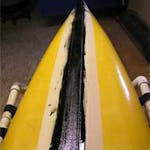
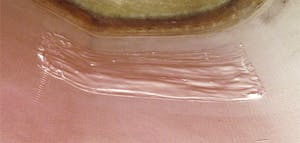
Full length Keel Strip
If you use your boat hard, the gel coat along the keel at the bow and stern will wear through after a few years. The thickness of the gel coat will determine how quickly this happens. Many lightweight boats have thin gel and will wear quickly. Of course you can always launch your boat fully floating so the gel never touches the ground, but what fun would that be?
We have added dozens of keel strips to kayaks. Over the years we have tried many different materials and techniques to find one that is easy, fast and long lasting. Appearance is nice, but we think it is less important than a repair that is easy, fast and long lasting. If you think of your boat as a piece of furniture, bring it to a reliable marine repair shop and pay to have it done.
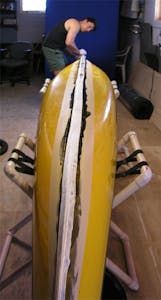
Most damage happens in the first and last quarter of the kayak. The mid-section does not normally get the wear and tear that the bow and stern do. On most boats we only keel strip the damaged area. Full keel strips are much harder to do, and the work requires two people. The steps are the same, but remember that the cure time of gel coat is short so you need to work quickly.
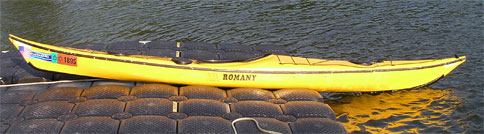
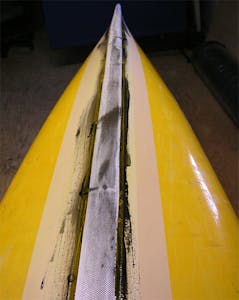
The photos of the yellow Romany had a single layer keel strip with three coats of resin/gel coat. These are the final photos of the boat.
In the these 6 sections we will lay out the steps needed to fix worn out keels.
Materials & Tools
Section 2
The needed materials will include a combination of the following;
- Masking Tape (1″ & 2″)
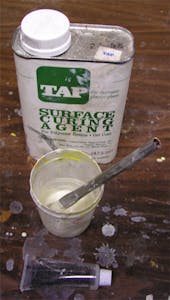
- Gel Coat and MEKP (catalyst)
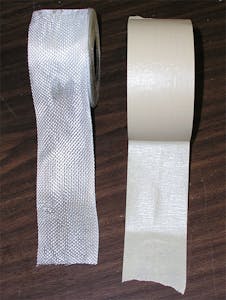
- Fiberglass Tape
- Acetone
- Styrene (used as a thinner, Acetone can be used)
The needed tools will include a combination of the following;
- Sand Paper
- Paint Brush(s)
- Latex Gloves
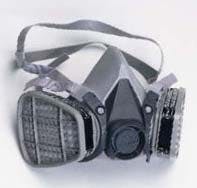
- Respirator
- Scissors
- Dry rag
- Paper towels
- Razor blade
- Flat blade screw driver to open cans
- Plastic Squeegee
- Mixing cup (with ounce measurements preferable)
- Mixing stick (used to mix gel with catalyst)
The work environment needs to include the following;
- Temperature between 60 and 90 degrees (F)
- Dry (low humidity)
- Good air circulation
Follow safety requirements on all tools and materials
Masking Tape
Masking tape comes in many different sizes and qualities. Don’t use cheap masking tape. Every time we try to save a little money buy using cheap masking tape we regret it. You will use more then you think so have extra on hand.
Fiberglass Tape
I’ve found 1.5″ tape is great for keel strips, but 2″ will work. The reason for tape vs. cloth is that the edges are bound for a neat job.
Gel Coat
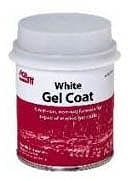 We prefer white or black keel strips but you can use other colors. It is very difficult to match the original boat color even if you get the gel from the manufacturer as the boats change color with UV exposure. We don’t use resin for keel strips, as gel coat will give a cleaner job and has UV inhibitors.
Gel coat, like polyester resin, comes with or without wax. For polyester resin to cure it must be air free. If the resin or gel coat does not have wax in it then you must cover it with an air barrier. Wax paper or plastic wrap can be used. When two coats are used (as we will do) for the keel strip, the first coat does not use a barrier (or wax), so the second coat can be added without sanding.
Follow the directions for adding the catalyst (which comes with the gel coat). The cure time will be between five and ten minutes depending on the amount of hardener and the outside temperature. Once the gel starts to go off (turns tacky) stop working as you will do more damage than good. It is better to add a drop less hardener then a drop too much. If you use too much hardener, your effective work time will be too short. Be careful though: if you don’t add enough hardener, the batch may never cure.
MEKP (catalyst)
 MEKP is a strong irritant. Avoid swallowing and all contact with eyes and skin. Ingestion can be fatal! Discard contaminated clothing. Wash contaminated skin thoroughly with soap and water. If swallowed, take large quantities of milk or water and immediately call a physician. MEKP in the eye may result in irreversible blindness, even if flushed out with water! Flush the eyes immediately with water. SECONDS COUNT! Continue flushing for at least 30 minutes, and call a physician. Do not take chances with this chemical. Wear goggles, gloves, protective clothing, and a respirator, and be careful.
Be sure all promoters and accelerators are thoroughly mixed into the resin before adding MEKP. These agents should never be mixed directly with MEKP. Violent decomposition and fire could result from such mixing or contamination. Stir MEKP into the resin slowly and carefully to avoid splashing.
Masking
Section 3
Preparation is the key to a good job. Take your time to get everything ready before mixing the gel coat. A helper will make the final job of putting the gel and glass down easier.
 Taping
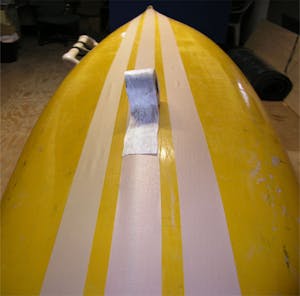
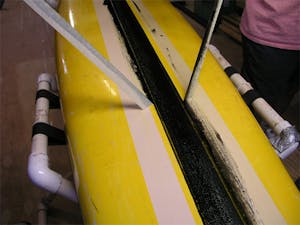
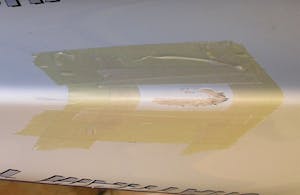
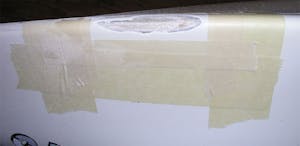
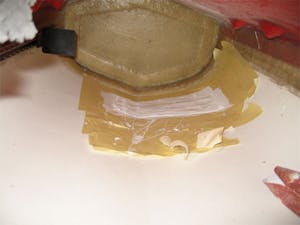
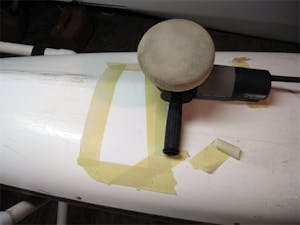
1) Run masking tape where you want the keel strip to go. We’ll call this the Guide Strip “A”. As the top two photos shows the Masking Tape Gide Strip should be the same width as the fiberglass tape you plan to use.
1.5″ or 2″ fiberglass tape are the standard widths for keel strips. Wider is not always better. The final gel coated area will be half and inch wider then the fiberglass tape.
 If you need extra reinforcement you can add a thinner width piece of fiberglass tape before adding the final piece of fiberglass tape. This second layer will add an additional hour or two of work and additional weight.
2) Put a 2″ strip of masking tape about 1″ away from each side of the Guide Strip “B & C”. We’ll call this the Mask Strip. The bottom two photos show the three strips of Masking tape.
3) Put a 1″ strip “D & E” evenly 1/4″ from the Guide Strip so it overlaps the two inch pieces of masking tape “B & C”.
4) This allows 1/2″ of extra space outside of the fiberglass tape for gel tapering and because the fiberglass is never perfectly even.
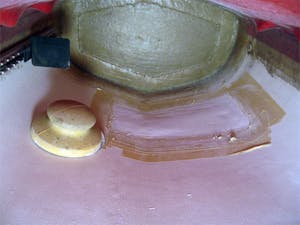
5) Remove the Guide Strip (photo bottom right). This will be called the Masked Area.
6) Another 2″ strip of tape can be added outside of the Mask Strip to stop drips.

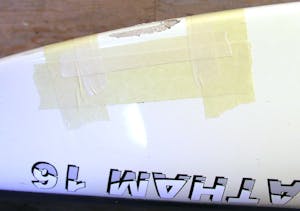
Middle tape is where the fiberglass tape will go. Outer tape is the edge of gelcoat.
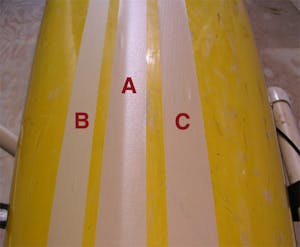
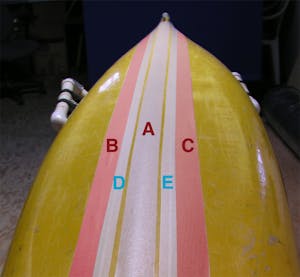
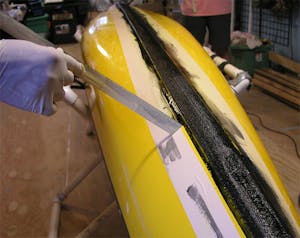
Final tape setup before sanding
Sanding
Section 4
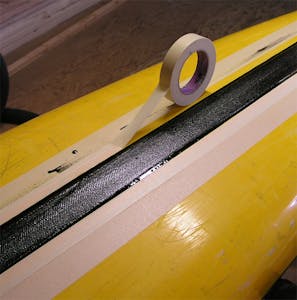
Cut fiberglass Tape
- Cut the fiberglass tape about an inch shorter then the Masked Area.
- Snip a 1/2″ cut into the ends of the fiberlass tape. This will stop it from unraveling.
- Put the tape aside in a clean dry area.
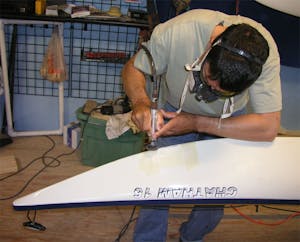
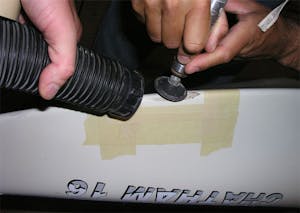
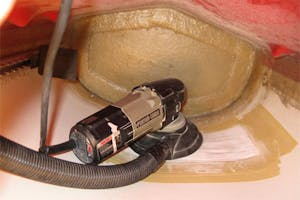
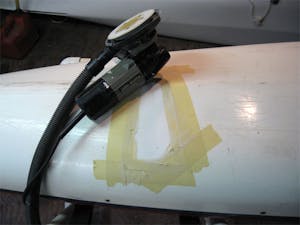
Use a low grit sandpaper to rough up the keel area.
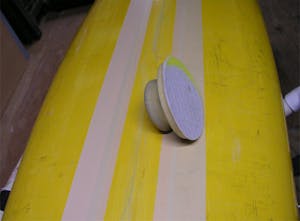
A sanding disk makes the job easier
Sand the keel area well
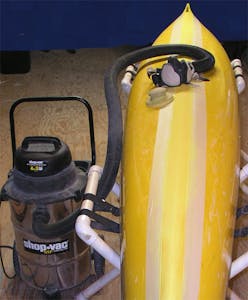
Wear a respirator and use a vac system if possible
Sanding/Cleaning
- Using a 100 to 200 grit sand paper, sand the Guide Strip area without damaging the Mask Strip.
- Clean the Mask Area with acetone.
- If the Mask Strip got damaged while sanding, replace the masking tape.
- Wipe Mask Area with Acetone.
Ready Work Area
- Clean the work area.
- Lay out all needed tools and supplies
- If doing separate Bow and Stern keel strips, get both areas ready.
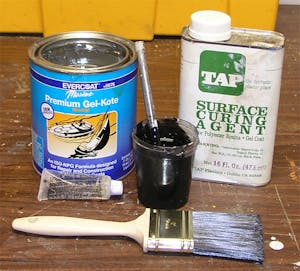
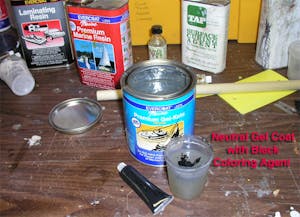
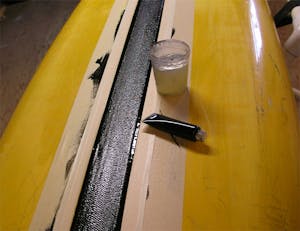
Gel, coloring agent and surface curing agent
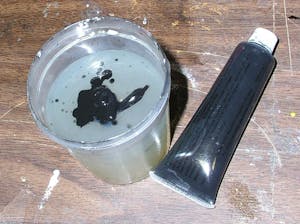
Color the clear gel to the color you want the keelstrip
Final Prep
- Fill a small cup half full with Acetone, to be ready for cleaning the bush or drips.
- Get the catalyst ready.
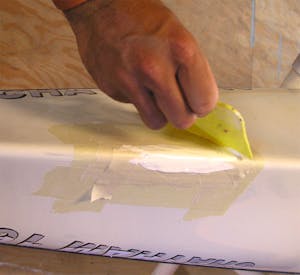
Tape & Gel
Section 5
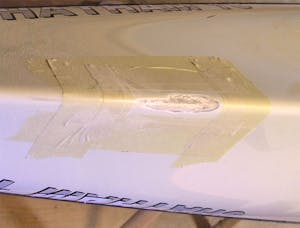
1) Mix the catalyst into the gel coat.
2) Quickly paint a coat of gel in the Masked Area. Neatness does not matter.
3) Put the fiberglass tape over the gel.
4) Paint gel on top of tape, wetting the tape fully.
5) Use the squeegee to spread and smooth out the gel.
6) Feather the edges.
7) Gel should be neat, but don’t worry as it will get another layer.
8) Finish before the gel starts to go off.
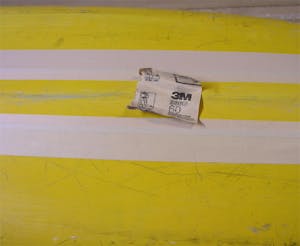
9) Add a drop or two of gel to the masking tape so you can test it later for hardness.
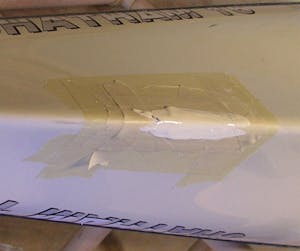
Clean & Remove Tape
1) Clean drips off the boat using acetone.
2) Clean the brush with acetone.
3) As the gel goes off, but before it gets hard, remove the inner piece of masking tape. If the gel gets hard, it will be difficult to remove this inner piece of masking tape.
4) Let it dry for a minimum of an hour.
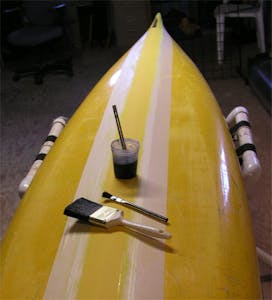
Ready to start
Painting on the gel
Make the fiberglass straight
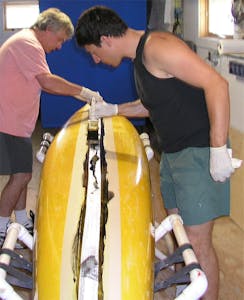
Two people makes for a easier job
Finished first coat
Pull off the innermost tape
Peeling off the masking tape

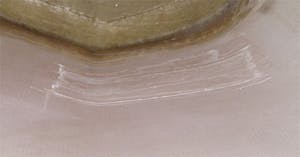
A clean smooth keel
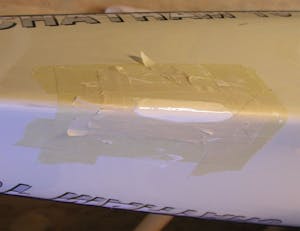
Prep For Next Coat
Section 6
1) Add new 1″ masking tape as close as you can to the gel without touching it.
2) As with the first coat, get everything ready before adding catalyst.
3) Thin out the gel with some Styrene. This will help fill in the dips to make a smooth final coat. Follow the directions carefully. If too much Styrene is added, the gel will not harden.
Final Coat
- Add the catalyst and start to paint on this coat thinly. Note: It will not be perfectly smooth.
- As above, remove the inner piece of masking tape before the gel gets hard.
- Let it dry for an hour or two then add the air barrier so the top will dry overnight.
Adding new masking tape
Add another inner layer of masking tape before second coat of gel
Second coat done
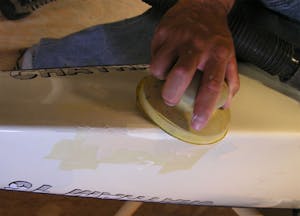
The Next Day
- Remove the air barrier.
- If unhappy with smoothness add masking tape and sand with fine grit paper.
- Remove all masking tape.
Gel Coat Repair
If you have a composite kayak sooner or later you will need to repair damaged gel coat. While beginners will say that this is the reason they buy plastic kayaks, experienced kayakers know that plastic wears faster and can’t be repaired as easy or reliability as composite kayaks. Repairing gel coat is easy.
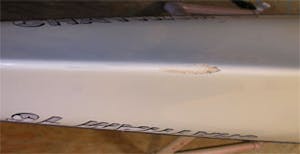
While some people will want the repair to be invisible, we don’t care about that. A kayak is a tool, not a piece of furniture. We use them hard and fix them to be sound, but not always beautiful. The difference between the sound repair and the beautiful repair is getting the proper color gel coat from the manufacturer and the amount of sanding you want to do.
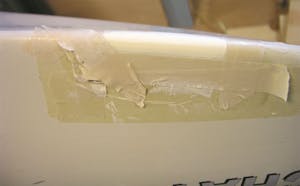
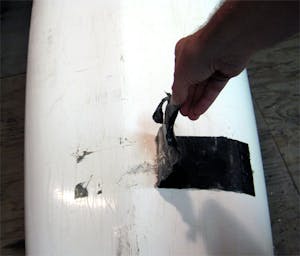
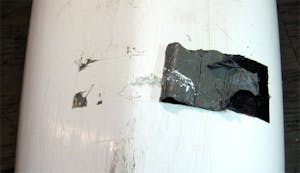
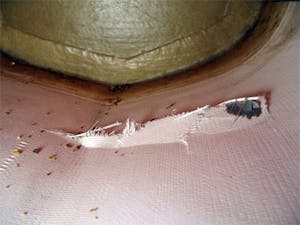
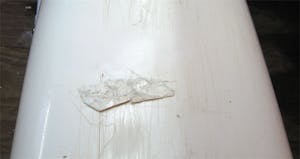
Closeup of damaged area
The keys to good repairs are preparation and time. Get everything ready (tools, materials, helpers) before each step and take your time. Using more hardener or heat to accelerate the cure time only makes for a brittle repair.
In the next few sections we will lay out the steps needed to fix a small damaged area on a composite kayak.
Preparation
Section 2
Damaged Gelcoat
The keel is the most likely area to damage on a sea kayak. This damage was caused by someone dropping the kayak onto concrete. The condition of the kayak will determine the type of repair to be done. If the keel is well worn, it might be time to add a Keel Strip. If the keel is still in good shape then all that is needed is to sand off the damaged gel coat and re-gel the area. Fixing the damaged area is much simpler then adding a keel strip. The first step in added a keel strip would be to fix the damaged area, but would not need to be sanded to a fine finish. Keel strips also add a few additional pounds to the kayaks. A keel strip does add strength to the damaged area.
Taping
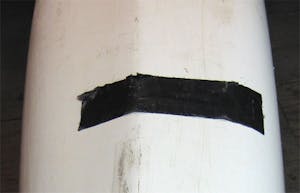
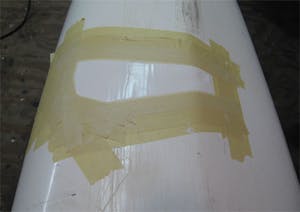
1) Put a 2″ strip of masking tape about one inch away from the damaged area. We’ll call this the Outer Mask. While the inner masking tape will be replaced a few times during the repair, the outer masking tape will stay until the repair is completed. The Outer Mask is just to keep the non-damaged area clean during the repair process. Most masking tape can’t say on for more then a day or so. Even less time if it is in direct sunlight. Always use good quality masking tape. The price difference between good quality and cheap masking tape is small. We don’t use the very expensive blue masking tape (Scotch-Blue™ Painter’s Tape) unless we know that the repair will take a few days. The blue masking tape is designed to remove cleanly and to last up to 14 day, even in direct sunlight.
2) Put a 1″ strip of masking tape evenly 1/4″ from the damaged area. It will overlaps the two inch pieces of masking tape. This “Inner Tape” will be replaced a few times during the repair.
Make a rectangle with the masking tape. Don’t follow the damage unless needed as you will end up using a lot more tape and it will be harder to sand. The inner tape needs to be smooth and flat. Clean the boat before putting the masking tape on in order to remove any oil or dirt. The outer piece of masking tape does not need to be as neat. If the damaged area is not as confined as in this repair, you might need to have a shape other then a rectangle. Another shape if fine, but will use more tape and be harder to remove and replace the tape during each step of the repair. Keep things as simple as the damaged area will allow.
Sanding
Section 3
Sanding is the time consuming part of any repair. It also determines the quality of the repair. Too much sanding and you will damage the fiberglass, which would force you to add a fiberglass patch to the inside of the kayak, doubling the amount of time for the repair. Not enough sanding and the repair will break out. Any stress lines need to be sanded all the way to the glass, without damaging the fiberglass.
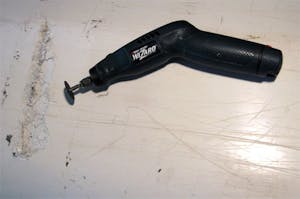
We love the Foredom flex shaft tool. It is a dremel tool on steroid. We have been using ours for over ten years without any maintenance. A dremel tool is the next best way of sanding a small gel coat damaged area. If you don’t have either tool then an 80 grit sandpaper and elbow grease will do the job. You can use a disk or palm sander if the damaged area is large enough, but these tools are hard to use for small damaged areas.
When sanding, take as many safety precaution as possible. Wear a respirator, not just a dust mask. Have another person hold a vacuum to the area being sanded. A vacuum will greatly reduce the amount of airborne dust. We also have a shop air filter running when we do any repairs.
Gel Coating
Section 4
If the masking tape was damaged when sanding the repair area, the inner tape should be replaced. We want clean neat lines and don’t want any tape strands to come off in the gel coat.
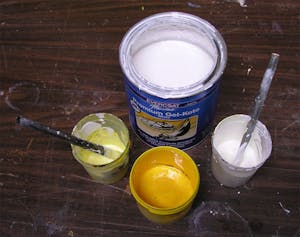
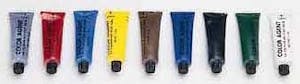
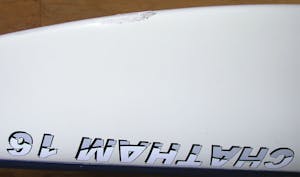
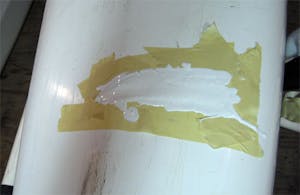
We like white hulls as they are easy to fix. Many first time kayak buyers purchase colored hulls because they look good. Once they get scratched up or damaged they don’t look good and lower the resale value of the kayak. Some manufacturers use an off white. This Necky Chatham 16 has an off white hull. We could have purchased a small amount of get coat from Necky, but it would cost more then we want to spend and take too much time to get. So we mixed our own off white color.
To start off we added some yellow (bottom center container) to half an ounce of white gel coat (top center can). Even a little yellow pigment will color the white more then we wanted for the final product. We use this pale yellow (left container) to add a bit at a time to the white (right container). All we do is touch our brush to the pale yellow (getting as little on the brush tip as possible and use that to mix into the white gel coat. After mixing, we dab a bit onto the undamaged area of the kayak to test the color. Then we repeat these steps until there is enough yellow (or whatever color is needed) to get close enough to the kayak color. After testing just wipe off the test gel coat with acetone on a paper towel. Always wear gloves when working with acetone.
You are now ready to paint on the colored gel coat. If you paint on one coat thick enough to build it up to the surounding gel coat then only one coat is required. Most gel coat is laminating gel and not finish gel. Polyester gel coat will not dry if air can get to it. It needs an air barrier. The three most used options are;
1) putting plastic wrap over the gel coat,
2) sparying mold release over the gel coat
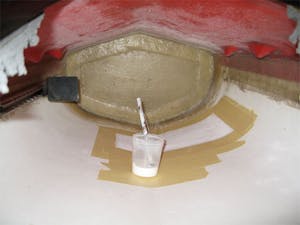
3) adding surface curing agent to the mixed gel before adding the hardener. Surface curing mixedagent is the easiest if you have it.
Clean the area with some acetone. Then when everything is ready, mix the hardener into the gel coat and paint the gel onto the area. It is better to mix onto the low end of required hardener then to add too much catalyst. A “hot” mix will dry quick, but be brittle and the repair will fail. A “cool” mix will give you more working time and will not be brittle. A repair like this, needed less than half an ounce of gel coat, but we mixed an once as it is easier to measure the hardener with a larger quantity.
Neatness is not real important. Just try to get the gel thick. Next use a plastic spreader to feather the edge as much as possible. The better the job here, the less you will need to sand, but again it is not that important as sanding a small damaged area is not too difficult.
Once you are finished painting the gel coat on, clean the brushes and containers with acetone. Then remove the inner tape before the get starts to harden. You only have five to fifteen minutes to get all of this done from when you add the hardener to the gel coat.
Sanding
Section 5
Once the gel coat has dried, add new inner masking tape. This tape will get damaged as you sand and you will have to replace it so you don’t sand the non-repair area. Put the inner tape 1/8″ away from the gel coat to help sand down the gel coat ridge.
As this will be the finished product it is important to sand slowly and follow the contour of the kayak. Start with an 80 grit sandpaper and work down to a 220 or even better 300 grit sandpaper. Don’t start with too high of a grit sandpaper as it will take too long to sand.
There is a best time to sand a repair. It is just when the gel coat is totally hard so it will not gum up the sandpaper. At this point the new gel coat is softer than the rest of the boat and will sand faster. When you are down to the high grit sandpaper you will find that the sandpaper will last longer and the sanding will happen quicker. This is usually a couple of hours after the gel coat has been applied, but not waiting overnight.
A hand disk sander works great. They are soft enough help follow the contour of the kayaks, but stiff enough to make the area flat.
The bottom photo shows the repair just before the finished product. At this point the high grit sandpaper is used to smooth out the area as much as possible. Move the inner tape a bit further away (1/4″) to get rid of the last of the gel coat ridge.
Finishing the Repair
Section 6
If you want a smooth shiny repair the next step is to wet/dry sand the area. This is done with 400 to 600 grit sandpaper. Keep a small (16 oz.) container full of water and dip the sandpaper into the water every few seconds. The wet/dry sandpaper will bring out some sheen to the repaired area.
The inner masking tape is 1/8″ away from the damaged area when using the wet/dry sandpaper.
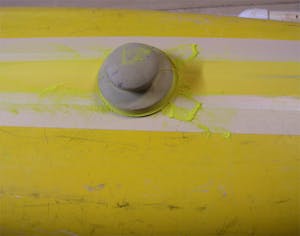
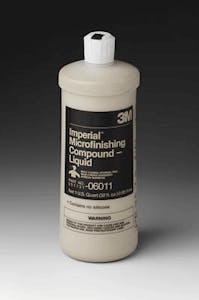
The final step in a great repair is to compound the area. Use a fine compound like the 3M Microfinishing Compound. Remember to use a respirator and work in a well vented area. Compounding works by removing a little material to bring the high areas down to the low area. Just compound enough to get the sheen into the repaired area. The masking tape should be 1/4″ away from the damaged area. While you can compound by hand a random orbital buffer works best.
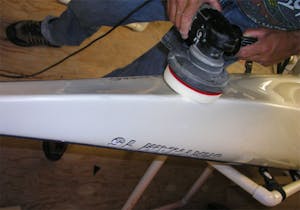
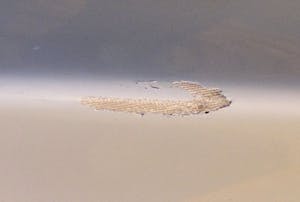
compound the repaired area
The Porter-Cable 7345 5-Inch Random Orbit Sander variable speed random orbital sander is the updated version of the one we have. It’s a great tool to have for doing this type of repair. You can add a foam pad to this tool and use it to compound or wax the repaired area. This random orbital sander has a hose attachment to hook up to a shop vac to help keep the dust down. Amazon has it for $150. It may be our best repair tool we own. The Foredom flex shaft tool is a close second, but much more expensive and not as versatile for the price.
Fixing a Holed Kayak
Introduction
This is a new section in the works. We decided to open this up to all visitors as it is in the process of being built. Once it is done, this information will be changed to note that it is not in Beta anymore. We estimate it will take until early November to finish this section.
This NDK Romany kayak got holed on a 4 Star Training program when two kayaks came in touch during a rescue. The other kayak was not damaged. The reason this kayak was damaged and the other kayak not damaged does not have anything to do with the design or quality of the boats involved. It is just how the two kayaks came in touch with each other.
This page shows the repair tape that was added on water at the time of the collision. A great feature of this tape is that it sticks to the kayak and can stay on the boat for days after a hole happens. Then it comes off easily with little to no glue left on the kayak. Tape was added to the inside the next day to back up the outside tape for a day of surfing.
Temporary on water repair
Removing the repair tape
The Hole
Section 2
The following photos show the hole from both the outside and inside of the kayak.
Remove the tape and inspect the damaged area
A clean damaged area is easy to fix.
Inspect the inside of the kayak for damage.
Inside damage is harder to fix as you are working in a tight area.
Cutting out the damage
Section 3
These photos show the hole being cut out.
A Dremel type of tool works well to cut out the damaged area.
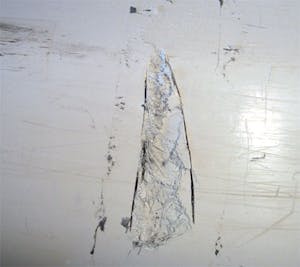
With the damaged area all the way through the hull, it needs to be cut out.
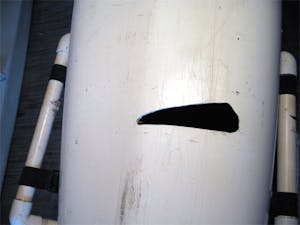
Damaged area cut out of hull

Inside of hull view of the damaged area cut out
First Outside Gel Coat
Section 4
These photos show some of the fiberglass used to make the patch. The first step was to put duct tape over the outside of the hull. Masking tape would work well. I wanted the temporary patch to be somewhat rigid. Paint a coat of gel on the inside of the hull (onto the duct tape). Then use many small pieces of 1.5″ fiberglass was added the the hole. Don’t worry about how it looks. The fiberglass will be bumpy. Keep adding pieces to fill in the full cut out area and an inch or two over the surrounding hull. Chop matt would work better then tape, but I find it hard to work with and we have lots of tape.
The inside needs a few layers of fiberglass. The first layers were added to fill in the hole. Starting with small pieces of fiberglass tape inside the hole. Then use larger pieces to cover the full taped out area. Once this is dried, sand it to be almost flat.

Cut all of the needed pieces of fiberglass
Inside patched area before sanding.
Once the inside dries, and it and add a layer of gel coat. It does not need to be neat (as in the photo), but the neater it is the less sanding you will need to do. Sanding is the time consuming part of the job, so work need and sand less. After the gel is painted on I use a squeegee to smooth it over and get it to a decent thickness (bottom photo).
Outside of hull with first coat done before removing the tape.
Masking tape removed.
Inside The Hull
Section 5
This is now your patch. Next you need to put larger pieces of fiberglass to cover the patch and an extra 2-3 inches to reinforce the patch. Sand to remove and rough areas and to look clean. Then a final sanding and a last coat of gel to cover everything and seal the repair area. Between each step the masking tape is being replaced. More then half a role of 1″ and 1.5″ tape was used. Don’t use cheap tape. Use 2″ pieces starting from the outside and then use 1″ pieces to finish off the inside. This way you just need to remove the 1″ pieces each coat and keep the 2″ pieces saving both time and money.
Finalizing the Inside
Section 6
Sanding the inside. A power sander that can be hooked up to a shop vac is a great tool. It keeps the dust down and the work area clean. A hand sander is also needed to fine sand the edges.
Finalizing the Outside
Section 7
320 grit sand paper allows for a fine sanding before you compound the repaired area. The compound will get the shine back into the gel coat. Start with a medium compound and then finish with a micro finish compound. The best time to do these steps are after the gel has cured, but while it is still soft as it will take less work to get it done. This is someplace between one and three hours depending on your mix and the temperature.
It’s all about how much sanding you want to do to get the repair looking perfect.
After sanding, compound will give the repair area a like new look.
The inside of the hull doesn’t need to be sanded smooth but get all of the rough spots out.
Final Repair with cut out below. The way you can see the repair is that it is not scratched up like the rest of the hull. Give it some time and it will match well.
The repaired area should look like a new kayak.
Coldwater Safety
Introduction
Section 1
Fact: Immersion in cold water kills more sea kayakers than any other factor in the sport. Cold water is the single most serious threat to the survival of an unprepared paddler.
Fact: Hypothermia is not normally the issue in cold water paddling, but rather a predictable series of shock reactions that first impair, then quickly preclude, effective self-rescue actions.
Fact: A review of 6 fatal and 12 near-fatal accidents (1985) noted that all but one involved water temperatures of 50°F or less. A more recent review of 20 accidents, 19 involving immersion of 26 people in cold water noted that 10 died before they could be rescued and the remainder had varying degree of hypothermia.
Fact: “Cold Water Kills” is the introduction to the medical safety section of the annual Cold Water Workshop held by Atlantic Kayak Tours. Our goal is to provide you, the beginning, intermediate or advanced paddler with the information you will need to keep yourself safe, healthy and enjoying paddling no matter what the season.
What is killing the kayakers?
For years, most paddlers thought that the foremost danger in cold water paddling was hypothermia, and mistakenly concluded that cold water drownings were caused by hypothermia. Mistakenly because new evidence suggests otherwise. So what is it? What is happening to the kayakers found upside down, still inside their boats, apparently never making attempts to exit or self rescue themselves? What happened to the 9 physically fit and tough U. S. Marines who capsized their boat one frigid winter day on the Potomac River, not one making it to shore alive? What could have happened to these paddlers? Did they drown? Did they die of hypothermia? Did they die of shame? Well, the answer may be both yes and no to all of these questions. What we can surmise though is that some sudden disabling event happened to precipitate these casualties. Most likely the injuries were part of a series of complex events that combines aspects of cold shock, hypothermia and drowning.
Cold Shock
Section 1
A new theory, developed within the last few years by Moulton Avery may well explain what is happening to some paddlers when suddenly immersed in cold water. Cold Shock can best be described as a series of physiologic events within the human body, characterized by incapacitation, immediate loss of breathing control and a high risk of sudden drowning.
Cold Shock Responses
Cold shock happens when you are suddenly immersed in cold water. Don’t mistakenly think that the water must be freezing. Cold shock can occur even in water temperature above 50°F. Wearing a dry suit, without proper clothing beneath is not protection from cold shock.
Immersion in cold water is characterized by the rapid development of a number of shock responses that can result in sudden drowning. A few of these responses can be consciously suppressed or moderated but most are beyond control. The most important shock response involves loss of the ability to control breathing.
The Gasp Reflex
Loss of breathing control begins the moment water makes contact with the skin, triggering a series of huge involuntary gasps for air. If your head is underwater when you gasp, you will immediately drown. Example: Oct. 1987, Water temperature: 41°F. Fit paddler, calm waters, folding double kayak with 36″ beam. Found hanging upside down in his boat, having made no attempt to exit. Not dressed for immersion.
Have you ever been in the shower when the hot water stops and cold water continues? The uncontrolled gasp is what we worry about. Don’t think you can control the gasp reflex, it is a physiological reflex. The only way to protect against the gasp reflex is to dress properly with full head gear including wet suit hood, nose clips and ear plugs. This is a subject we are still learning about and all the facts are not in.
Hypothermia
Section 3
Human Beings and the Cold
Hypothermia: Hypothermia is called the silent killer and can happen even if you don’t capsize or get wet. Hypothermia occurs when the body core temperature begins to fall below its normal 98.6°. Wind, rain or sweating can lead to hypothermia.
With slow onset hypothermia as the core temperature drops below 97° shivering usually starts and you might feel your hands and feet are cold (even if properly covered). This is why its said that, if your feet are cold, put on a hat. To preserve core heat, the body will slow the circulation of blood to its extremities, so they get cold first. This is one of the hypothermia warning signs. It should not be disregarded. Even at this early stage, hypothermia is very dangerous. The loss of dexterity can make it impossible to open a hatch for extra clothing, or you might be unable to use a paddle float to do a self rescue, and many kayakers have not been able to put their spray skirts back on. This can happen even with the best hand gear made. As stated, it isn’t improper hand gear, but the bodies survival instinct of slowing circulation to the extremities.
As the core temperature drops to the lower nineties, shivering will slow or stop and the person might begin to feel warm again. This is when the real danger begins. The loss of mental alertness will occur, causing wrong decisions to be made. The victim will lose coordination, increasing the likelihood of a capsize. At this stage it becomes very difficult to warm the person safely outdoors, or for the person to save themselves. The victim’s body will not be able to warm itself.
How Your Body Regulates Core Temperature
Section 4
Vasodilatation (dilation of blood vessels) increases surface blood flow & increases heat loss (when ambient air ater temperature is less than body temperature).
Vasoconstriction (constriction of blood vessels) decreases blood flow to periphery & decreases heat loss.
Sweating – cools the body through evaporative cooling.
Shivering – generates heat through the increase in chemical reactions required for muscle activity. Visible shivering can maximally increase surface heat production by 500%. However, this is limited to a few hours because of depletion of muscle glucose and the onset of fatigue.
Increasing/Decreasing Activity will cause corresponding increases in heat production and decreases in heat production.
Behavioral Responses – putting on or taking off layers of clothing will result in heat regulation
How We Lose Heat to the Environment or Stay Dry = Stay Alive!
Radiation
The loss of heat to the environment due to the temperature gradient (this occurs only as long as the ambient temperature is below 98.6°F). Factors important in radiant heat loss are the surface area and the temperature gradient.
Conduction
Through direct contact between objects, molecular transference of heat energy.
Water conducts heat away from the body 25 times faster than air because it has a greater density (therefore a greater heat capacity).
Steel conducts heat away faster than water. Example: Generally conductive heat loss accounts for only about 2% of overall loss. However, with wet clothes the loss is increased 5 times.
Convection
A process of conduction where one of the objects is in motion. Molecules against the surface are heated, move away, and are replaced by new molecules which are also heated. The rate of convective heat loss depends on the density of the moving substance and the velocity of the moving substance (water convection occurs more quickly than air convection). Wind chill is an example of the effects of air convection. The wind chill table gives a reading of the amount of heat lost to the environment relative to a still air temperature.
| Wind Speed | Actual Air Temperature (F) | ||||
| MPH | 50 | 40 | 30 | 20 | 10 |
| 5 | 48 | 36 | 27 | 17 | -5 |
| 10 | 40 | 29 | 18 | 5 | -8 |
| 15 | 35 | 13 | 10 | -5 | -18 |
| 20 | 32 | 18 | 4 | -10 | -23 |
| 25 | 30 | 15 | -1 | -15 | -28 |
| 30 | 38 | 13 | -5 | -18 | -33 |
| 35 | 37 | 11 | -6 | -20 | -35 |
Evaporation
Heat loss from converting water from a liquid to a gas.
Perspiration – evaporation of water to remove excess heat.
Sweating – body response to remove excess heat.
Insensible Perspiration – body sweats to maintain humidity level of 70% next to skin – particularly in a cold, dry environment you can lose a great deal of moisture this way.
Respiration – air is heated as it enters the lungs and is exhaled with an extremely high moisture content.
It is important to recognize the strong connection between fluid levels, fluid loss, and heat loss. As body moisture is lost through the various evaporative processes the overall circulating volume is reduced which can lead to dehydration. This decrease in fluid level makes the body more susceptible to hypothermia and other cold injuries.
Response to Cold
Heat Retention – (positive factors)
- Size/shape (Eskimo vs. Masai)
- Insulation (layering/type)
- Fat (as insulation)
- Shell/core (shunt blood to core) shell acts as a thermal barrier Total = Heat Retention
Heat Production – (positive factors)
- Exercise, shivering Limited by:
- Fitness
- Fuel stores (glycogen)
- Fluid status (efficient exercise)
- Food intake (kindling, sticks, logs) Total = Heat Production
Cold Challenge – (negative factors)
- Temperature
- Wet (rain, sweat, water)
- Wind (blowing, moving, e.g. biking) Total = Cold Challenge
Heat Retention + Heat Production Less Cold Challenge = Hypothermia
Types & Signs of Hypothermia
Section 5
Hypothermia defined:
“A decrease in the core body temperature to a level at which normal muscular and cerebral functions are impaired”.
Two types:
- Sudden Onset – rapid chilling from cold water exposure.
- Long Onset – progressive exposure over a period of time. Usually occurs with exposure below 50° wind, wet from rain, sea spray or perspiration all create problems. May develop silent hypothermia with gradual onset of physical and mental fatigue unaccompanied by shivering.
Conditions Leading to Hypothermia
- Cold temperatures
- Improper clothing and equipment
- Wetness
- Fatigue, exhaustion
- Dehydration
- Poor food intake
- No knowledge of hypothermia
- Alcohol intake – causes vasodilatation leading to increased heat loss
What are hypothermia temperatures
- Below freezing
- 40° – Ex. Shenandoahs, wind and rain
- 60° – Ex. Rayanna and hurricane
- Any temperature less than 98.6° can be linked to hypothermia (ex. hypothermia in the elderly in cold houses) or peripheral circulation problems such as trench foot and frostbite.
Signs and Symptoms of Hypothermia
Watch for the – Umbles – stumbles, mumbles, fumbles, and grumbles which show changes in motor coordination and levels of consciousness
Mild Hypothermia
- Core temperature 98.6 – 96°F.
- Shivering – not under voluntary control
- Can’t do complex motor functions (ice climbing or skiing) can still walk & talk
- Vasoconstriction to periphery
Moderate Hypothermia
- Core temperature 95 – 93°F.
- Dazed consciousness
- Loss of fine motor coordination – particularly in hands – can’t zip up parka, due to restricted peripheral blood flow
- Slurred speech
- Violent shivering
- Irrational behavior – Paradoxical Undressing – person starts to take off clothing, unaware he/she is cold
- I don’t care attitude – flattened affect
Severe Hypothermia
- Core temperature 92 – 86° and below (immediately life threatening).
- Shivering occurs in waves, violent then pause, pauses get longer until shivering finally ceases – because the heat output from burning glycogen in the muscles is not sufficient to counteract the continually dropping core temperature, the body shuts down on shivering to conserve glucose
- Person falls to the ground, can’t walk, curls up into a fetal position to conserve heat
- Muscle rigidity develops – because peripheral blood flow is reduced and due to lactic acid and CO2 buildup in the muscles
- Skin is pale
- Pupils dilate
- Pulse rate decreases
- At 90° the body tries to move into hibernation, shutting down all peripheral blood flow and reducing breathing rate and heart rate.
- At 86° the body is in a state of “metabolic icebox.” The person looks dead but is still alive.
Death from Hypothermia
- Breathing becomes erratic and very shallow
- Semi-conscious
- Cardiac arrhythmia’s develop, any sudden shock may set off Ventricular Fibrillation (uncoordinated heart rhythm – quickly leads to death)
- Heart stops, death
How to Assess if someone is Hypothermic
- If shivering can be stopped voluntarily = mild hypothermia
- Ask the person a question that requires higher reasoning in the brain (count backwards from 100 by 9’s). If the person is hypothermic, they won’t be able to do it. [Note: there are also other conditions such as altitude sickness that can also cause the same condition.]
- If shivering cannot be stopped voluntarily = moderate – severe hypothermia.
- If you can’t get a radial pulse at the wrist it indicates a core temperature below 90 – 86°.
- The person may be curled up in a fetal position. Try to open their arm up from the fetal position, if it curls back up, the person is alive. Dead muscles won’t contract – only live muscles.
An old Emergency Room adage: A person is never dead until they are warm and dead. This means that even if you don’t have vital signs you assume the person is still alive and treat them for hypothermia. Remember, people have survived sustained periods of hypothermia and drowning from cold water. Cold water induced Mammalian reflex slows heart rate, oxygen and energy requirements in an effort to preserve life.
Treatment of Hypothermia
Section 6
The best method of treating hypothermia and / or cold shock is to prevent it from happening in the first place.
Dress appropriately for the water temperature regardless of the air temperature. A general rule of thumb is to wear wet or dry suits when water temperatures is less than 50°F.
The head is a primary heat loss area
Avoid cottons
Wool, nylon or synthetics will not prevent cold shock
Carry dry extra clothing
Carry a sleeping bag or space blanket
Field Treatment
Always remember your ABC’s when assessing some one for cold related injuries. Their AIRWAY must be open, they must be BREATHING and their must be blood CIRCULATING, otherwise your efforts are for naught!
Learn CPR if you don’t know already. Your training may save a life!
Gently remove cold, wet clothing. Place into dry clothing, sleeping bag, wrap with space blankets. Prevent further conductive or convective heat loss.
External heat – chemical or other heat packs to armpits, groin, around neck, scalp (near major blood vessels), body to body contact (share your heat but must be skin to skin contact).
Warm Liquids – Small sips of warm not hot liquids.
Avoid alcohol – A vasodilator, alcohol causes blood vessels to dilate and releases cold blood from the extremities into the core. May precipitate heart arrhythmias and sudden death.
Move gently and only horizontally – Avoid after drops of blood pressure and release of cold blood to the core. Sudden, vertical position changes can cause after drop and sudden death.
Seek medical attention as soon as possible.
Cold Water Equipment
Section 7
What you wear for cold water paddling will vary depending on the water temperature, weather and the wind, but the same theory applies for any temperature.
To keep warm your skin must be dry. The first layer is used to move the moisture away from your skin and into the outer layers. The shell is used to keep you and your insulation dry. Most insulation works much better when dry.
Dress light. As you stand on the shore before going out you should feel cool. As you start paddling you will warm up quickly. Adjust you temperature by adjusting your head gear and gloves. You can also put a wind breaker/Storm Cag over your dry suit.
Following is a list of clothing. It is listed in order from against your skin to the outer layer. The middle layers are used to adjust for different temperatures.
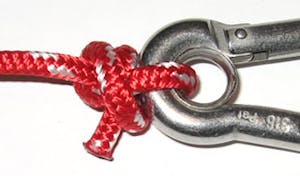
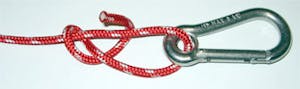
Buntline Hitch
Knot for paddlepark & tow lines
The Buntline Hitch is the best knot (hitch) for tying tow lines or paddle parks to a carabiner. The Buntline ends up tight to the carabiner making it easier to pass under deck lines. It will not come undone easily, but can be hard to untie after a while. A small price to pay for the advantages.
1) The line passes through the carabiners and around the running end of the line.
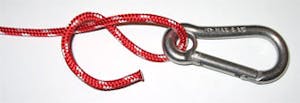
2) Bring the line back under both lines.
3) Contine around the running end of the line, then pass the line back through the opening between both hitches.
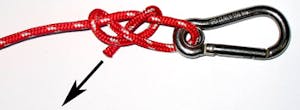
4) Snug the hitches together
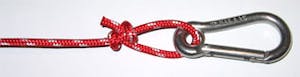
5) Snug the hitches up tight against the carabiner.
6) Here is a closeup of the above photo.
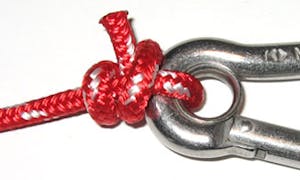
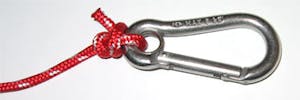
7) Back side of the knot. Notice that the gate is now at the top of the photo
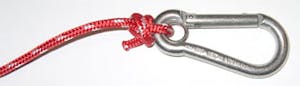
8) Closeup of the above photo.